I am a do-it-yourself kind of person. From one of my work places I have noticed that ring bearer pillows tend to be more expensive, so I decided to make my own. I figured out a way to use what I have to make a pillow for my wedding for under $1 USD. Getting materials, if you do not have any on hand, will be more than a dollar depending on what materials you choose to use.
First you have to figure out what kind of pillow you want to make. I decided to make a square pillow with my wedding colors and some symbols that mean something in the Chinese culture. I decided I wanted red and yellow/gold and that I wanted to put a dragon and phoenix on the pillow. These two animals are symbols of a couple, they are lovers, in the Chinese culture.
 |
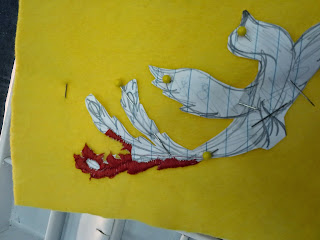
| Start somewhere in your work. I started at the tail. |
 |
| I then went to the wing |
 |
| Nice thing about the paper, it can be easily removed. |
 |
| On to the dragon. |
 |
| Adding beads to make the image shine. |
 |
| The lucky knot I made. Took time to get it right. |
 |
| The final results |
Materials:
- Fabric -- I used yellow-gold felt that I had already
- Thread in the color or colors you intend to do embroidery with
- Beads and notions for decorating the pillow
- Wide ribbon
- Cording or thinner ribbon
- Fiber fill
- Scratch paper for pattern making
- Pencil or pen
- Pins
- Needles -- I used two different ones because of the small beads I used.
Steps:
- First you need to decide the shape of the pillow and the size. I used paper from my recycling bin. I measured out an even square to cut out and pinned down to two felt sheets. Then cut out the shape.
- I drew out the image of a phoenix and a dragon based on some images I have seen online. I used my sketches as a guide. I cut out the paper and placed them down to decided on placement. I then pinned them down on one piece of fabric.
- This is the step when you start embroidery with the color of thread of your choosing. I was able to have red thread around the house so I was good to go. I started at the top of the tail and worked my way down. I stitched along guide lines that I made in my sketch, These lines are great for details and can be used for a guide for beads later. Try to get the thread even and untwisted so it will lay flat. This will make the work look neat and clean.
- After embroidery, it is time to add beads and details to your work. I used glass seed beads that I had from other crafts. The beads I picked were red, gold, yellow, and three black beads for the eyes.
- Once your embroidery and bead work is done, you are ready to add cording or ribbon to the center that will hold the rings. I decided to follow steps, I found online on YouTube, to tie a Chinese lucky knot to decorate the center more. I used nylon cording. I burned the ends to prevent fraying. I secured the knot with thread.
- It is now time to sew up the pillow. Aline the right-sides together. Make sure your wide ribbon is between the right sides. This will allow the ribbon to be on the backside of the finished pillow so it can be easily held. Stitch along the edges allowing an opening so you can stuff the pillow.
- Once the sides are sewn you need to turn the pillow right-sides out. This allows you to stuff the pillow with fiber fill. Once the pillow is stuffed, it is time to finish sewing the opening.
- Once the opening is closed you can be done or you can put a stitch in the center to add more flair.
 I am a do-it-yourself kind of person. From one of my work places I have noticed that ring bearer pillows tend to be more expensive, so I decided to make my own. I figured out a way to use what I have to make a pillow for my wedding for under $1 USD. Getting materials, if you do not have any on hand, will be more than a dollar depending on what materials you choose to use.


No comments:
Post a Comment